Wednesday, December 16, 2020

D365FO - HTTP Error 503. The service is unavailable

Introduction: 
In this blog, we will see how to resolve HTTP Error 503 - The service is unavailable in Microsoft Dynamics 365 Finance and Operations


Details: 
For resolving these kinds of errors, we have 2 solutions as of now. One is to do from the front end that is LCS and the second is to do from the back-end that is from Visual Studio

From LCS:

Reset the IIS from the LCS. Steps:

1.     Go to LCS, login

2.     Select the respective project, full details


3.     Go to Maintain -> Restart service


4.     Select IIS and confirm it


5.     Wait till the service is being restarted


From Visual Studio:

From the back-end, open the VM and follow the below steps:

1.     Login to VM

2.     Open the Visual Studio

3.     Go to Dynamics 365 tab

4.     Click on Restart IIS Express


Thanks for reading and stay connected with us for more updates!!!

Jagdish Solanki | Senior Technical Consultant | CloudFronts

Business Empowering Solutions Team

“Solving Complex Business Challenges with Microsoft Dynamics 365 & Power Platform”

Sunday, December 6, 2020

D365 Finance and Operations - Database Synchronization using PowerShell

Introduction: 

In this blog, we will see how we can synchronize the database through PowerShell in Microsoft Dynamics 365 Finance and Operations

Steps: 
K:\AOSService\webroot\bin\Microsoft.Dynamics.AX.Deployment.Setup.exe 
-bindir "K:\AosService\PackagesLocalDirectory" 
metadatadir "K:\AosService\PackagesLocalDirectory" 
-sqluser "axdbadmin" -sqlserver "." -sqldatabase "AxDB" 
-setupmode "sync" -syncmode "fullall" 
-isazuresql "false" -sqlpwd "*" 
-logfilename "H:\MSSQL_LOGS\AxDB_log.log"

Example:
K:\AOSService\webroot\bin\Microsoft.Dynamics.AX.Deployment.Setup.exe 
-bindir "K:\AosService\PackagesLocalDirectory" 
metadatadir "K:\AosService\PackagesLocalDirectory" 
-sqluser "axdbadmin" -sqlserver "." -sqldatabase "AxDB" 
-setupmode "sync" -syncmode "fullall" 
-isazuresql "false" -sqlpwd "AOSWebSite@123" 
-logfilename "H:\MSSQL_LOGS\AxDB_log.log"

Thanks for reading and stay connected with us for more updates!!!

Jagdish Solanki | Senior Technical Consultant | CloudFronts

Business Empowering Solutions Team

“Solving Complex Business Challenges with Microsoft Dynamics 365 & Power Platform”

Monday, November 23, 2020

Sales return order line registration in D365FO and AX 2012

Introduction: 
Sales return order line registration in X++ 

Details: 
Consider SalesReturnOrderRegisterLine is the table where records are with SalesLine referenced. If we are required to register serialized items than salesReturnOrderRegisterLine.inventSerialId will be considered and if item referred with batch then salesReturnOrderRegisterLine.inventBatchId will be considered.
public static void inventoryRegistration(SalesId _salesId)
{
	SalesReturnOrderRegisterLine 	salesReturnOrderRegisterLine;
	SalesLine                       salesLine;
	TmpInventTransWMS               tmpInventTransWMS;
	InventTransWMS_Register         inventTransWMS_Register;
	InventDim                       inventDim;
	InventTrans                     inventTrans;
	VendPackingSlipTrans            vendPackingSlipTransLoc;
	InventTransOrigin               inventTransOrigin;

	while select salesReturnOrderRegisterLine
		 where salesReturnOrderRegisterLine.SalesId == _salesId
	{
		salesLine =  SalesReturnOrderRegister::updateDispositionCode(salesReturnOrderRegisterLine.InventTransId);

		inventTransWMS_Register = InventTransWMS_Register::newStandard(tmpInventTransWMS);

		select firstonly inventTrans
			where inventTrans.StatusReceipt == StatusReceipt::Ordered
			exists join inventTransOrigin
				where inventTransOrigin.RecId == inventTrans.InventTransOrigin
				&&    inventTransOrigin.InventTransId == salesLine.InventTransId
				&&    inventTransOrigin.ReferenceId == _salesId;

		tmpInventTransWMS.clear();
		tmpInventTransWMS.initFromInventTrans(inventTrans);
		tmpInventTransWMS.InventQty     = salesReturnOrderRegisterLine.SalesQty;
		tmpInventTransWMS.LineNum       = int642int(salesLine.LineNum);
		inventDim                       = salesLine.inventDim();
		inventDim.inventSerialId        = salesReturnOrderRegisterLine.inventSerialId;
		inventDim.inventBatchId         = salesReturnOrderRegisterLine.inventBatchId;
		tmpInventTransWMS.InventDimId   = InventDim::findOrCreate(inventDim).inventDimId;
		tmpInventTransWMS.ItemId        = salesLine.ItemId;

		inventTransWMS_Register.writeTmpInventTransWMS(tmpInventTransWMS, inventTrans, InventDim::find(tmpInventTransWMS.InventDimId));

		if (!inventTransWMS_Register.updateInvent(salesLine))
		{
			throw error("Error during sales return order registration");
		}
	}
}

Consider SalesReturnOrderRegister is the class which has below static methods

public static SalesLine updateDispositionCode(InventTransId _inventTransId) { SalesLine salesLine = SalesLine::findInventTransId(_inventTransId, true); ReturnDispositionCode returnDispositionCode; SalesReturnOrderRegister::runPreReturnOrderRegisterLine(salesLine); salesLine.ReturnDispositionCodeId = returnDispositionCode.DispositionCodeId; salesLine.update(); return salesLine; }


public static void runPreReturnOrderRegisterLine(SalesLine _salesLine) { InventTransOriginId salesLineInventTransOriginId; InventTransOriginId reservationLineInventTransOriginId; SalesLine reservationLine; ReturnDispositionCode returnDispositionCode; if (_salesLine.ReturnStatus == ReturnStatusLine::Awaiting) { if (!_salesLine.ReturnAllowReservation && _salesLine.isStocked()) { SalesLine::changeReturnOrderType(_salesLine.InventTransId); _salesLine = SalesLine::findInventTransId(_salesLine.InventTransId, true); } select firstOnly returnDispositionCode where returnDispositionCode.DispositionAction == DispositionAction::Credit; _salesLine.ReturnDispositionCodeId = returnDispositionCode.DispositionCodeId; _salesLine.update(); } else if (_salesLine.ReturnStatus == ReturnStatusLine::Registered) { select forupdate firstonly reservationLine where reservationLine.InventRefTransId == _salesLine.InventTransId; if (reservationLine || _salesLine.qtyMarked()) { if ((_salesLine.returnDispositionCode().DispositionAction == DispositionAction::ReplaceScrap || _salesLine.returnDispositionCode().DispositionAction == DispositionAction::ReturnToCust || _salesLine.returnDispositionCode().DispositionAction == DispositionAction::Scrap)) { if (reservationLine.SalesQty == reservationLine.RemainSalesPhysical) { reservationLineInventTransOriginId = InventTransOriginSalesLine::findInventTransOriginId(reservationLine.DataAreaId, reservationLine.InventTransId); salesLineInventTransOriginId = InventTransOriginSalesLine::findInventTransOriginId(_salesLine.DataAreaId, _salesLine.InventTransId); InventTransOrigin::deleteMarking(salesLineInventTransOriginId, reservationLineInventTransOriginId, -_salesLine.QtyOrdered); reservationLine.delete(); } } else { throw error("@SYS332911"); } } } }

Thanks for reading and stay connected with us for more updates!!!

Jagdish Solanki | Senior Technical Consultant | CloudFronts

Business Empowering Solutions Team

“Solving Complex Business Challenges with Microsoft Dynamics 365 & Power Platform”

Tuesday, August 11, 2020

Factbox of workflow history on purchase order in D365FO

Introduction: 
In this blog, we will see how to create factbox of workflow history of purchase order in Microsoft Dynamics 365 Finance and Operations

Details: 
Well, Factbox is a very pretty cool feature available from the earlier version AX 2012. It is very easy to achieve in Dynamics 365 as well. 

Here we will see how easy it is and steps for that. 


As shown in the above image, we will be going to create factbox for the "Tracking details list"

Steps: 

Create the solution in Visual Studio and project for that. We'll be required four objects mainly that is one display MenuItem, Table, Form (on which to display factbox), another Form (factbox). Reference attached below:

1. Table

For displaying workflow history, we need to create the extension of table WorkflowTrackingStatusTable and create the normal relation and its relevant properties as

2. Factbox

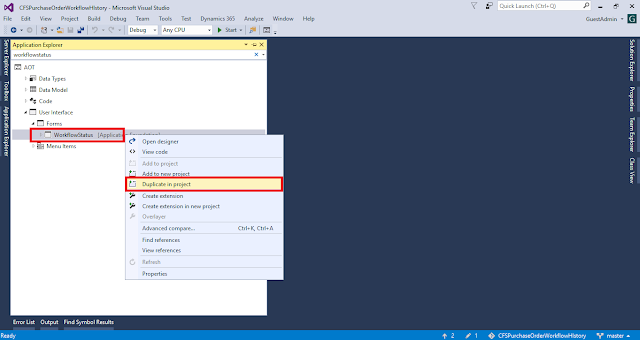
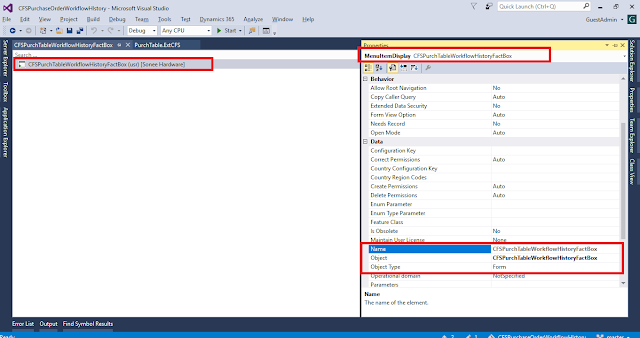
Now we are required to create the factbox of workflow history. For that we will use the effortless technique, where we will duplicate the standard form "WorkflowStatus" and will name as CFSPurchTableWorkflowHistoryFactBox (give name as per your naming convention standards)

After duplicating and renaming the form, we need to change the pattern as "custom"


After applying the custom pattern, delete the NavigationList which is not required in factbox, and do visible false ActionPane and PanelTab

After that create the new Grid and assign the data source to it in the property and put all the required fields to show in factbox

3. Display MenuItem

We will attach the created factbox form to the display menu item and relevant label "Workflow history"

4. Base form

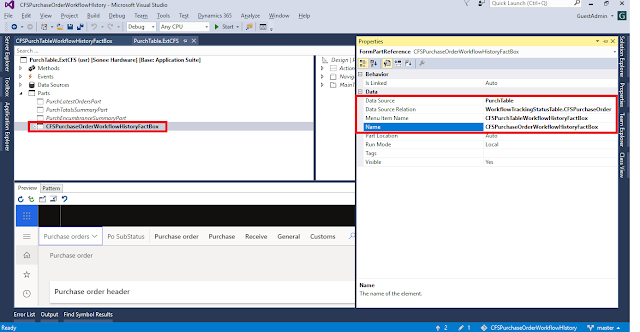
Base form we call it as where we will attach the factbox. Here it is purchase form. Go to Parm section and create a new part and give it a relevant name and its properties

Properties: 

Data source: Attached data source with which workflow history is connected
Data Source Relation: WorkflowTable.RelationName
Name: Part name

That's it. Build the project and go the frontend and check the output how it looks like.

Conclusion:

It results as (we can scroll left and right to see all the tracking details list)

Hurray, How pretty it looks like!

In the above example, we have seen how we can develop factbox in Microsoft Dynamics 365 Finance and Operations.  

Thanks for reading and stay connected with us for more updates!!!

Jagdish Solanki | Senior Technical Consultant | CloudFronts

Business Empowering Solutions Team

“Solving Complex Business Challenges with Microsoft Dynamics 365 & Power Platform”

Email Parameters | SMTP Configurations for sending Test Mail from D365FO

Introduction: 
In this blog, we will see how to set up email parameters and SMTP configuration for sending test mail from Microsoft Dynamics 365 Finance and Operations.

Details: 
Go to the Email Parameters by follow this path: System administration -> Setup -> Email -> Email Parameter.

Another easiest way to find the email parameter in a quick manner, go to the search box and simply write email parameter as below shown screenshot


Steps: 

1. In the configuration tab, set up the SMTP as in shown below image
Move SMTP in the right box named with ENABLED to enable 

2. In SMTP settings tab, configure the below stuff: 

    Outgoing mail server: smtp.office365.com
    SMTP port number: 587
    Username: put the email id from which email should be sent 
    Password: appropriate password of the email
    Specify if SSL is required: true

3. In Test mail tab: 

    Email provider: SMTP
    Send to: Put the email to whom test mail should be sent 
In the final, click on the "Send test mail" and then sample mail will be sent to the respective email address.
    
Conclusion:
In the above blog, we have seen how to set up SMTP configuration to test "send email" functionality from the email parameter form. 

Thanks for reading !!!
Monday, August 10, 2020

What is Kernel Hotfix and Application Hotfix in Microsoft Dynamics AX 2012?

Introduction: 

In this blog, we will see what includes in Kernel Hotfix and Application Hotfix in Microsoft Dynamics AX 2012. 

Details: 

1. Kernel Hotfix: 

·    This hotfix updates Microsoft dlls. E.g. update are the executable files (ax32.exe, ax32serv.exe) and assemblies (Microsoft.Dynamics.AX.*.dll)

·    There are no code-level changes.

·    This hotfix required to install at all the client PCs & Servers, where any of the components of AX is installed.

·    A kernel fix is always cumulative.


2. Application Hotfix: 

        ·   This type of hotfixes affects code development done by partners.

·    Updates in the SYP, GLP, FPP & SLP layers (the layers reserved for Microsoft code). These changes are made in the AX model store in AX 2012 and later versions

·    An application fix is NOT cumulative.


Import, Export and Uninstall the model from Microsoft Dynamics AX 2012

Introduction: 

In this blog, we will see how we can import, export and uninstall the model from Microsoft Dynamics AX 2012 

Details: 

Prerequisite for import, export and uninstall the model from the environment, run the command prompt as in administrator mode.

Form Importing the model script: 
Install-AXModel -File "Path_Of_the_Model_File" -server ServerName -database DatabaseName_Model –Details

Exmaple:
Install-AXModel -File "D:\Model\VARModel.axmodel" -server CFSEnvVM -database DAX2012R3CFSEnv_Model –Details
Form Exporting the model script: 
Export-AXModel -Model 'Model' -File 'Path' -server 'ServerName\DBName' -database 'DatabaseName_Model'

Exmaple:
Export-AXModel -Model 'CUS Model' -File 'C:\ModelFile\CUSModel.axmodel' -server 'TESTSERVER\CFSDAXSQL2014' -database 'DAX2012R3Blank_model'
Form Uninstalling the model script: 
Uninstall-AXModel -Model 'Model' -server 'ServerName' -database 'DatabseName_Model'

Exmaple:
Uninstall-AXModel -Model 'VAR Model' -server 'CFSEnvVM' -database 'DAX2012R3Test_model'

Thanks for reading !!!
How to export projects layerwise in Microsoft Dynamics AX 2012

 Introduction: 

How to export projects layerwise (usr, cus, var, etc.) in Microsoft Dynamics AX 2012? 

Details: 
Here, we will see how we can export the projects from AX 2012. Now It's very easy to do so. 

We need to create a class or job in the respective environment and just need to do run. 
static void exportProjects(Args _args)
{
    #AotExport
    TreeNodeIterator        tni;
    ProjectNode             projectNode;
    int                     exportFlag;
    Dialog                  dialog = new Dialog();
    DialogField             folderName;
    DialogField             projectDefinitionOnly;
    DialogField             exportFromLayer;
    DialogField             projectType;
    UtilEntryLevel          layer;

    SysExcelApplication     application;
    SysExcelWorkbooks       workbooks;
    SysExcelWorkbook        workbook;
    SysExcelWorksheets      worksheets;
    SysExcelWorksheet       worksheet;
    SysExcelCells           cells;
    SysExcelCell            cell;
    SysExcelFont            font;
    int                     row;
    CustTable               custTable;
    str                     fileName;

    fileName    = "D:\\Backup XPOs.xlsx"; //By specifying the directly, we will get the list of exported projects
    //Excel Part..............................................................................

    dialog.addText("This will export all projects (shared or private) that exist in a selected model.");
    projectType             = dialog.addFieldValue(enumStr(ProjectSharedPrivate), ProjectSharedPrivate::ProjShared);
    projectDefinitionOnly   = dialog.addField(extendedTypeStr(NoYesId), 'Project Definition Only');
    folderName              = dialog.addField(extendedTypeStr(FilePath));
    exportFromLayer         = dialog.addField(enumStr(UtilEntryLevel), 'Projects from layer');

    dialog.run();

    if (dialog.closedOk())
    {
        if (!folderName.value())
            throw error("Missing folder");

        exportFlag = #export;
        if (projectDefinitionOnly.value())
            exportFlag += #expProjectOnly;

        layer = exportFromLayer.value();
        
        switch (projectType.value())
        {
            case ProjectSharedPrivate::ProjPrivate:
                tni = SysTreeNode::getPrivateProject().AOTiterator();
                break;

            case ProjectSharedPrivate::ProjShared:
                tni = SysTreeNode::getSharedProject().AOTiterator();
                break;
        }

        projectNode = tni.next() as ProjectNode;

        while (projectNode)
        {
            if (projectNode.AOTLayer() == layer && projectNode.name() like "CFS*") //if [like] specifies, system will export the projects which names starts with CFS
            {
                projectNode.treeNodeExport(folderName.value() + '\\' + projectNode.name() + '.xpo', exportFlag);

                row++;
            }

            projectNode = tni.next() as ProjectNode;
        }

        info("Projects Exported Successfully & Exported Projects List to Excel Sheet");
    }
    else
        warning("No action taken...");
}
After running the class it will prompt as below. After that select the directory where to export all projects and select the layer from which layer all projects should be exported. 


Thanks for reading!!!

Saturday, April 11, 2020

Message API - Message::AddAction() in D365FO Version 10.0.10 PU34 | New Feature

Introduction: 
From the version 10.0.10 Platform update 34, Microsoft has added a new feature Message::AddAction() which is shown in the message bar. 

Details: 
Message API associated with display or action menu items, which is visualized as a hyperlink/link button. 

It is linked with a single record at a time, called single action. 

In below taken example, we will show sales order is navigated to the form SalesTable from the message bar. 

For testing it, we'll create the runnable class also know as job in AX 2012. 
class CFSMessageAPI
{
    public static void main(Args _args)
    {
        SalesTable            salesTable = SalesTable::find('SH-000121');
        MenuItemMessageAction actionData = new MenuItemMessageAction();

        actionData.MenuItemName(menuItemDisplayStr(SalesTable));
        actionData.TableName(tableStr(SalesTable));
        actionData.RecId(salesTable.RecId);
        str jsonData = FormJsonSerializer::serializeClass(actionData);

        int64 messageId = Message::AddAction(MessageSeverity::Informational, "Sales order details", salesTable.customerName(), MessageActionType::DisplayMenuItem, jsonData);
    }

}
Let's see how it works, 


In my case it's showing Mitchell. Click on the link. 


After clicking on the action link, it is navigated to the sales order record form as shown in the above link. 

Hurray, How pretty feature is released !!!

Conclusion:
In above example, we have seen how Message API is routed to the record. 

Thanks for reading !!!

Friday, April 10, 2020

How to delete workspace from TFS Visual Studio

Introduction:

In this blog, we will see how we can delete any of the TFS workspace which is assigned to different user

Even if tried to remove/delete the workspace from Visual Studio, We're unable to map existing workspace to new user.  

In such scenario, It is necessary to delete the workspace explicitly while getting the error as below 
"The working folder 'Workspace_Folder_Local_Path' is already in use by  the workspace : on computer 


Solution: 

1. Open Developer Command Prompt for VS2015 from Start menu

2. For getting the list of workspaces associated with user, run below command
tf workspaces /server:https://{TFS}.visualstudio.com/{CollectionName} /owner:"{Owner}"
Explanation, in my case {TFS} is xxxx.visualstudio.com/defaultcollection and {Owner} as Jagdish Solanki, Eventually it will look something like this,
tf workspaces /server:https://xxxx.visualstudio.com/{CollectionName} /owner:"Jagdish Solanki"
Reference:


3. To delete the workspace, run below command 
tf workspace /server:https://{TFS}.visualstudio.com/defaultcollection /delete "{Workspace};{Owner}"
It will looks something like this,
tf workspace /server:https://xxxx.visualstudio.com/defaultcollection /delete "SCM-DEV-1;Jagdish Solanki"
Once the above command is executed, system will prompt you if user has any pending change(s). Are you sure want to delete the workspace? (Yes/No). Enter yes
Reference: 


Enable/Disable & Visibility an Action pane button on a list page using interaction class in D365

Introduction:
In this blog, we will see how we can enable/disable or change the visibility of the form control in interaction class.

Standard behavior of the form, system does not allow us to write code on form which comes under form template -> List page

It Seems like below attached image (Here we will consider form VendTableListPage. Property of form as shown below)


Each ListPage form consisting with an interaction class as shown in property, Here it is VendTableListInteraction. Each interaction class has one override method which is selectionchanged()

Solution: 
Here we will override the method of selectionchanged() as below
[ExtensionOf(classStr(VendTableListPageInteraction))]
final class VendTableListPageInteractionCFSJSClass_Extension
public void selectionChanged()
{
    next selectionChanged();

    //for visibility
    this.listPage().actionPaneControlVisible(formControlStr(VendTableListPage, ), false);

    //for enable/disable
    this.listPage().actionPaneControlEnabled(formControlStr(VendTableListPage, true);
}

For all other ListPage, we can go through interaction class. For reference, go through below mentioned classes:

AgreementListPageInteraction
BankDocumentTableListPageInteraction
CatProcureOrderListPageInteraction
CatVendorCatalogListPageInteraction
CustBillOfExchEndorseListPageInteraction
CustomsExportOrderListPageInteraction
CustPDCListPageInteraction
CustPDCSettleListPageInteraction
CzCustAdvanceInvoiceListPageInteraction
CzVendAdvanceInvoiceListPageInteraction
EcoResCategoryHierarchyPageInteraction
EcoResProductListPageInteraction
EmplAdvTableListPageInteraction
EntAssetObjectCalendarListPageInteraction
EntAssetWorkOrderPurchaseListPageInteraction
EntAssetWorkOrderPurchReqListPageInteraction
EntAssetWorkOrderScheduleListPageInteraction
EPRetailPickingListPageInteraction
EPRetailStockCountListPageInteraction
EximAuthorizationListPageInteraction
EximDEPBListPageInteraction
EximEPCGListPageInteraction
GlobalAddBookListPageInteraction
HcmCourseAttendeeListPageInteraction
HcmWorkerAdvHoldTableListPageInteraction
InventBatchJournalListPageInteraction
InventDimListPageInteractionAdapter
JmgProdStatusListPageInteraction
JmgProjStatusListPageInteraction
PCProductModelListPageInteraction
PMFSeqReqRouteChangesListPageInteraction
ProdBOMVendorListPageInteraction
ProdRouteJobListPageInteraction
ProdTableListPageInteraction
ProjForecastListPageInteraction
ProjInvoiceListPageInteraction
ProjInvoiceProposalListPageInteraction
ProjProjectContractsListPageInteraction
ProjProjectsListPageInteraction
projProjectTransListPageInteraction
ProjUnpostedTransListPageInteraction
PurchCORListPageInteraction
PurchCORRejectsListPageInteraction
PurchLineBackOrderListPageInteraction
PurchReqTableListPageInteraction
PurchRFQCaseTableListPageInteraction
PurchRFQReplyTableListPageInteraction
PurchRFQVendorListPageInteraction_PSN
PurchRFQvendTableListPageInteraction
PurchTableVersionListPageInteraction
ReqTransActionListPageInteraction
ReqTransFuturesListPageInteraction
ReqTransListPageInteraction
RetailOnlineChannelListPageInteraction
RetailSPOnlineStoreListPageInteraction
ReturnTableListPageInteraction
SalesAgreementListPageInteraction
SalesQuotationListPageInteraction
SalesTableListPageInteraction
SysListPageInteractionBase
SysUserRequestListPageInteraction
UserRequestExternalListPageInteraction
UserRequestListPageInteraction
VendEditInvoiceHeaderStagingListPageInteraction
VendNotificationListPageInteraction
VendPackingSlipJourListPageInteraction
VendPDCListPageInteraction
VendPDCSettleListPageInteraction
VendProfileContactListPageInteraction
VendPurchOrderJournalListPageInteraction
VendRequestCategoryListPageInteraction
VendRequestListPageInteraction
VendRequestWorkerListPageInteraction
VendTableListPageInteraction
VendUnrealizedRevListPageInteraction

Thanks for reading !!!